Showing posts with label Holiday. Show all posts

Monday, January 2, 2012

...Holiday {Christmas} Card Display

Yet again these sisters find two different ways to achieve the same purpose: get those Christmas cards off the counter and on display! Oddly enough both sisters decide to display the cards in a mobile-style, though one whips one up quickly by calling on Pottery Barn, and the other whips one up quickly by repurposing a few yards to string and thread to create one from scratch.

Mary Martha

Lay out cards in desired arrangement. Punch holes in tops and bottoms as necessary to connect the cards while keeping the mobile in balance. {Note: I did not have a hole punch, so I used a straight edge to make a small X instead of a hole. This proved equally effective.}

Connect cards with string/thread, securing knots large enough that the string won't fall through the card.

Hang in a fun location when finished!

Cost: virtually nothing. The cards were free {thanks, friends and family!} and I used up old embroidery floss and some silver cord from a previous Christmas project.

Time: less than the time it takes to watch Santa Clause 3: The Escape Clause. :}

BEFORE


AFTER


Wednesday, December 28, 2011

...Holiday {Winter} S'mores

Inspired by a warm-weather Christmas and a new fire pit at Mary Martha's house, Little Annie concocted an idea: holiday s'mores. Similar to regular campfire s'mores, holiday s'mores have marshmallow, graham crackers, and the smokey flavor of fire. However, what sets these apart from our summertime favorites is the substitution of peppermint bark for the milk chocolate. Hold onto your hats, folks, this is gonna get crazy.


Mary Martha's version: homemade peppermint bark

After Little Annie's suggestion to make holiday s'mores over the new fire pit, Mary Martha stumbled across a BHG recipe for peppermint bark on Pinterest. Success! Holiday s'mores would become a reality!

Ingredients needed: milk chocolate {candy bar or chips work fine}, chocolate candy coating {Wilton's from either a craft store or at the grocery store seasonally}, white candy coating, and white chocolate baking squares {or chips}, and candy canes.


Line a rimmed baking sheet with foil. Melt the milk chocolate with the chocolate candy coating {chop coarsely with a serrated knife first}. Pour into the foil lined pan, smoothing out with a spatula {shake pan if necessary to create an even layer}.


Sorry about the green lighting. We had the festive under-cabinet lights illuminating our handiwork.


Next melt the white chocolate with the white candy coating.
{Note: recipe suggests using a new pan. We did not. This would have ensured the white chocolate stayed white. Ours instead came out a little gray/tan. Taste was not affected.}


Pour the melted white chocolate over the chocolate in the pan. Use a small spatula to swirl them together.


Crush two or three candy canes into smaller pieces {your choice whether you want a fine dusting or some larger chunks}. Warning: do not attempt to smash whole candy canes in a bowl with a wooden spoon. Result below:


Instead, please use this tip from Mary Martha's genius hubby: break candy candes into smaller pieces with hands first, then wrap in a towel or other cloth item {we used a cloth napkin} and smash with a ladle or other utensil.


Result:


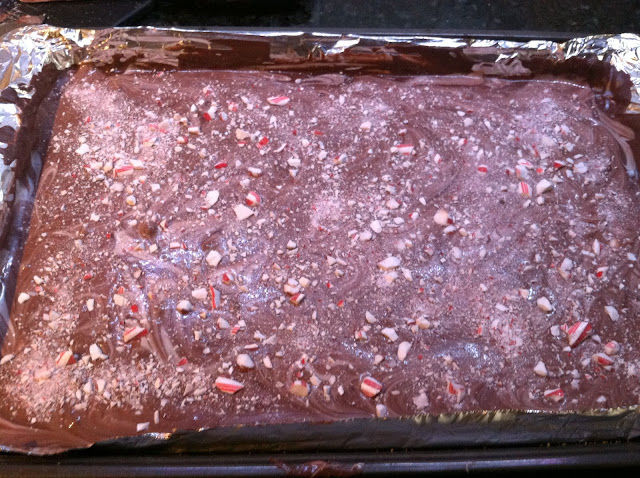
Finally, sprinkle candy cane pieces over chocolate.


Chill final product for at least 30 minutes before cutting and enjoying.