As I noted yesterday, I'm way behind on a bunch of stuff {kudos to those of you who catch the reference}. I just got around to transferring over my files, which I usually do after filing my taxes. Yes, yes, I know, I'm three months off track. At least I've got it done now.
I wanted to share my files and the process I go through every year, simply because it's easy, organized, and pretty! Back in 2007, shortly after my husband and I got married, we were embarking on filing our taxes together for the first time. I was deeply dedicated to Martha Stewart's recommendations, and read about color-coding files and rotating on a yearly basis. With a little begging and persistance, I managed to convince my dude to buy into my system. I'm going to turn this system into a recipe for your easy use.
{Note: I recommend doing Steps 1-3 before buying any files. This should give you an accurate picture of how many different colors and quantity of files you'll need.}
Ingredients
A variety of color files
A variety of color hanging files (of the same color sequence as the regular files)
A milk crate
A banker's box
Steps
1. Determine how many different categories of documents and files you have. This is easiest to do by making a list of all the paper you're currently storing, and sorting that list into categories. For example, we have five categories: utilities, credit cards (expenses), insurance, medical, and investments/other income. Within each of these categories, we have sub-categories. In utilities, for example, we have mortgage/home, cell phone, vehicle registration, important receipts, donations, and dog. Our other traditional utility bills we have opted for online billing. I recommend you do the same!
2. Assign a color to each category. For us, utilities = blue, credit cards = red, investments = orange, insurance = yellow, and medical = green. It is important that color-coordination is the same with your hanging files AND your regular files. I will explain soon.
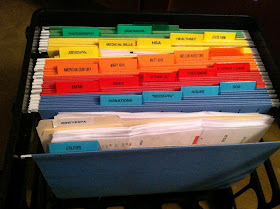
3. Sort your current year documents into their categories and sub-categories, if necessary. For this step, only include documents dated from this year (2012). There is one exception I will grant to this: if the documents reflect something from the previous year that is still an issue or is still being dealt with this year, you may keep it in this step.
4. Label your hanging files as appropriate for each of your categories and sub-categories. Hyper-categorize in this step. As you work through the year, you want to have a very specific place to file items as well as retrieve them if necessary. After you drop them into the milk crate, take special care to stagger the tabs when you insert them so the labels are visible at all times. I know this sounds persnickety, but seriously, this saves so much time! {See photo.}
5. If necessary, stick plain colored folders within the hanging folders to sub-categorize within your sub-categories. You can see this in the first blue folder in the photo: we have folders for our vehicle registration and cell phone bills. I've also added one in the HSA folder as my husband and I each have our own HSA vendors.
6. File your current year paperwork into the milk crate!
{Now the following steps may not apply to you yet, if you're not retrofitting this filing system. However, I will explain how this filing system gets rotated each year. If you're retrofitting, here we go!}
The best part of the above system is that all documents received throughout the year that are deemed necessary for keeping are already filed. When tax season comes around, everything is right there! I usually keep all tax documents clipped together at the front of the milk crate as they come in. Once your taxes are done, it's time to move those files!
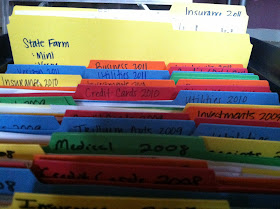
7. Color by color, transfer paperwork from your current year hanging files to corresponding-colored regular files. I tend not to hyper-categorize in this step simply because I want to minimize the amount of space I take up in the file box. For example, all my utilities docs went into one blue folder, except for cell phone bills (too thick!) Label the top of the tab -- Utilities 2011, for example -- and list on the front cover of the file what utilities are included in the file. This will provide quick reference if you need to look back for anything without having to dig through the whole file just to find out it's the wrong file!
8. Plop these new files into your banker's box (I had to upgrade to a plastic bin this year to accomodate 5 years worth of files).
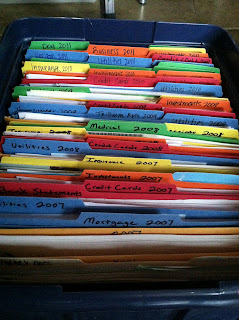
9. Bundle all of your tax documents into a manila envelope, label it with the year {2011 Taxes} and stick it in front of all the folders for that year. You will always know, if you need to reference them, that your tax returns and documents are in a manila folder in front of the documents from the same year. I even label the top edge of the envelope so if it is peeking out, I can see what year it is.
10. Purge unnecessary documents each year as you see necessary. This year, for example, I am getting rid of documents from 2006 that have no bearing on our current life: apartment leases, utility bills, investment statements. We held on to them because we just weren't sure whether or not we needed them. Well, in 5 years we haven't. So long, docs! Store your archive box/bin somewhere that doesn't take up valuable storage space (garage, back of a closet, etc.).
Note: The most important thing about this filing system is that it can and should be adapted to your personal circumstances. Each year you should reevaluate which categories you need to add or need to remove. Also, some documents may fit in more than one location. See below.
{As you can see, there are some discrepancies in my filing procedure, if you look in the photos. We have Dog listed with the blue utilities in our hanging files and with the green medical in our regular files. This was a decision we made to fit our dog's needs on a year to year basis: every year we have to get her vaccinated in order to get her licensed, which we thought of as a utility. However, the last couple of years she has needed some unexpected procedures -- medical. Also, medical is yellow in our hanging files and green in our regular files -- this was due to a shortage of green hanging files. We've managed with it and since I'm the one who transfers them each year, I make sure to reference previous years' files to stay consistent.}
Consistency is the second most important element of this filing system. Without consistency in the system, there is little hope for successful organization.
Tips:
-File all current documents as soon as you receive them.
-Don't be afraid to add or remove files as you need throughout the year.
-Revel in how pretty your files looks each time you use them!
My hope is that you can make sense of your documents this year and all the years going forward! Feel free to leave any questions or comments below!
Two young professionals, two different cities, two different approaches to...
Thursday, July 12, 2012
Wednesday, July 11, 2012
Organizing the craft pile
Apologies for the hiatus, but as stated in our opening post, we're a couple of busy cats. This poss finds me in the last week of my summer break and I'm just now getting around to some of my major organization projects! What on earth have I been doing?
From here it was a matter of assembling everything into the bin to be visible and easily accessible. This included adding any of my crochet books, patterns, guides, hooks, and unfinished projects {read wreath form partially filled out with pom-poms}.
While that's neither here nor there, I wanted to share with you my not-so-complicated way of organizing my overflowing craft mess. For the last few months, I've had most of it stored in a bulky plastic bin, and what didn't fit was poking holes in a ratty plastic bag from Michael's. Works in progress littered nooks and crannies, reminding me of all I wasn't finishing, while irritating my husband. Finally, I bought two new bins that match the bins we had recently purchased when organizing our garage. One day, when I've completed all those craft projects I hope to complete, the bins will nestle peacefully with their brethren in the garage.
For the time being, however, I had to make all my crafty stuff fit into these two bins. Now this is a less-than-glamorous approach to organizing craft supplies. I've seen those beautiful and colorful craft rooms and closets on Pinterest. While I wish this were possible for me, I live in an urban condo with no closets or indoor storage. So the bins would have to do!
At left you can see the mess of yarn balls, tangles, and riff-raff. This was my first endeavor: get all my yarn supplies neatly contained in one container. I knew from previous organization attempts {read: moving} that I had mainly yarn crafts and other crafts. Since I had two bins, this distinction would continue.
I decided to collect all the skeins of unused yarn and stack it into the bin on their ends. This would allow me, when opening the lid, to see what colors and quantities of yarn I had without having to dig. That was the easy part.
Next I needed to figure out what to do with the tangly mess I had created. First things first: unknot everything and wind it into tidy little balls. This took quite awhile, but in the end, I had a nice collection of wound yarn. Glancing around my house, I noticed a stash of Toms Shoes bags {well, technically called flags}. I have been trying to figure out a way to use these and I had it! I dropped all the little yarn balls into the bag. Voila! {The bag had a tag on it, which I used to label the bag with the contents. Always important when organizing!}
I had a number of yarn pom-poms from a wreath I'm in the process of making {so what if it's been over 6 months??}. I decided to drop those into another Toms bag, along with the other supplies needed to finish the craft. This was an immediate upgrade from their previous storage in an old shipping box. {I labeled this bag, too, as it would be confusing with two Toms bags in one bin!}
From here it was a matter of assembling everything into the bin to be visible and easily accessible. This included adding any of my crochet books, patterns, guides, hooks, and unfinished projects {read wreath form partially filled out with pom-poms}.
Next I had to tackle the "other" craft items, all those miscellaneous projects spewing from the plastic bag. Yikes. This mess contained the remnants of hat making, stationery making, thread-wrapped eggs, drawing and art supplies, magazine bead necklaces from when I was in middle school, and other random mish-mash.
Almost done! |
This was a bit more time-consuming, as I had to sort through everything, decide what was really worth keeping, what wasn't, and what belonged with what. I had previously grouped many similar items in plastic zip-top bags, and that appeared to be working fine. There were a number of other random items, though, and I decided to stick those into yet another set of Toms bags. This cut down on the loose stuff floating around my bin! Many projects had already been contained in tote bags, too, so I allowed them to stay. Again, I stacked most items on their ends so I could see what was in the bin just by opening the lid. This saves me from having to dig to the bottom of a bin for something larger or unseen.
In the end, the bins are not as fancy or glamorous as Martha Stewart's craft closet, but they work for my home and my projects.
Sunday, January 29, 2012
...Sunday morning waffles!
Mary Martha
Sometimes breakfast foods just sound good. And sometimes, sleeping in sounds better than breakfast. Waffles sounded really good last night, but they sounded like work and dishes this morning. Instead, I got a bit of coffee into my system and whipped them up for lunch!
Recipe found from Martha Stewart:
Serves 4 to 6
8 tablespoons (1 stick) melted unsalted butter, plus more for waffle iron
2 cups all-purpose flour
1/4 cup packed light-brown sugar
1 teaspoon baking soda
1 1/2 teaspoons baking powder
1/2 teaspoon ground cinnamon
1/2 teaspoon salt
3 large eggs, separated, room temperature
2 cups buttermilk, room temperature
1 teaspoon pure vanilla extract
Directions
Grease waffle iron with a small amount of melted butter, and heat. In a large bowl, sift together the flour, sugar, baking soda, baking powder, cinnamon, and salt.
In a separate bowl, whisk together egg yolks, buttermilk, melted butter, and vanilla. Pour into dry mixture, and combine.
In a medium bowl, beat egg whites until stiff but not dry. Fold whites into batter.
Ladle about 1/3 cup batter onto each section of the waffle grid; spread batter almost to the edges. Close lid, and bake 3 to 5 minutes, until no steam emerges from waffle iron.
Transfer cooked waffles to a baking sheet; place in an oven set to low heat, about 200 degrees, while using remaining batter.
Read more at Marthastewart.com: Buttermilk Waffles - Martha Stewart Recipes
Here are some pictures to document the progress:
My favorite part about homemade waffles? The recipe makes more than we can eat in one sitting, so we freeze the rest and use them as toaster waffles throughout the week! Win!
Happy Sunday!
Pin It
Monday, January 2, 2012
...Holiday {Christmas} Card Display
Yet again these sisters find two different ways to achieve the same purpose: get those Christmas cards off the counter and on display! Oddly enough both sisters decide to display the cards in a mobile-style, though one whips one up quickly by calling on Pottery Barn, and the other whips one up quickly by repurposing a few yards to string and thread to create one from scratch.
Lay out cards in desired arrangement. Punch holes in tops and bottoms as necessary to connect the cards while keeping the mobile in balance. {Note: I did not have a hole punch, so I used a straight edge to make a small X instead of a hole. This proved equally effective.}
Connect cards with string/thread, securing knots large enough that the string won't fall through the card.
Hang in a fun location when finished!
Cost: virtually nothing. The cards were free {thanks, friends and family!} and I used up old embroidery floss and some silver cord from a previous Christmas project.
Time: less than the time it takes to watch Santa Clause 3: The Escape Clause. :}
Mary Martha
Lay out cards in desired arrangement. Punch holes in tops and bottoms as necessary to connect the cards while keeping the mobile in balance. {Note: I did not have a hole punch, so I used a straight edge to make a small X instead of a hole. This proved equally effective.}
Connect cards with string/thread, securing knots large enough that the string won't fall through the card.
Hang in a fun location when finished!
Cost: virtually nothing. The cards were free {thanks, friends and family!} and I used up old embroidery floss and some silver cord from a previous Christmas project.
Time: less than the time it takes to watch Santa Clause 3: The Escape Clause. :}
BEFORE
AFTER
Sunday, January 1, 2012
...New Year's Eve.
Both sisters tried out a low-key version of New Year's Eve...and together!
Mary Martha
For this New Year's Eve, after a day of prepping and planning for next semester, I did my nails all pretty, went to a new thai place for dinner {spent 2 hours waiting for table and food -- it was packed!}, then joined Little Annie and her hubby for some long-distance Mario Kart!
HAPPY 2012!
Little Annie
Little Annie
After five days of holiday festivities in the Southwest with Mary Martha, the hubs and I decided that we'd reached our celebration quota for 2011. I spent most of the day with our friends' newborn baby boy then came home to figure out how to improve my Mario Kart skills {I'm the video game dunce of the group}. After making what I considered serious progress, hubby and I invited Mary Martha and her man to ring in the new year with us via some on-line Mario Kart. Despite my hours of practice, I started the new year by having my arse handed to me by my fellow celebrants time and time again. Couldn't have planned a better NYE. :}
HAPPY NEW YEAR!